In this post you’ll learn how to deploy a python application in the form of a directory which can be distributed as an archive or as a single executable file. This is the last of three posts on a series about UI development in python embedding Java based business logic and shows you a concept, how to address the challenges in the deployment of such an application.
In the two previous posts about Fast UI-Prototyping in Python using PyQt5 Designer and Embedding Java Logic into a Python Application I demonstrated how to use the PyQt5 designer to design UIs and how to embed and access Java business logic provided in JARs from python code.
Background: In my job we had got a great Java based Eclipse Rich Client application, which had to be migrated to a newer sustainable technology with least efforts. In order to be able to reuse the business logic we decided to keep that in Java. However, we wanted to develop the UI using python and PyQt5. In the previous posts we learned the tools and organizational steps necessary to realize this endeavour. Now I would like to develop a possible approach to deploying such an application.
pyinstaller or Auto-Py-To-Exe
The missing gap in our toolchain is pyinstaller or auto-py-to-exe. The latter is a browser based frontend to the commandline tool pyinstaller. It allows you to package python application for easier deployment. There are quite some things one has to keep in mind, in order for everything to work fine. In the following sections I’ll describe all the steps necessary.
Preparation steps
If you’ve already completed the instructions from the previous posts, you have already completed the following steps.
- Make use of Virtual Environments:
If you’ve followed this tutorial from the start, this step is already complete. It is necessary to prevent your global environment from interfering with a specific project environment. Details see in this post. - Provide the JAR containing your Business Logic:
As described in this post, get a JAR contiaining the business logic you want to use from python. - Provide the py4j JAR:
Get a recent JAR here of the Java library for py4j to enable python’s py4j package to startup a JVM and instantiating a service to access business logic in your own JARs. - Provide a Java Runtime:
In order to enable our app to launch Java code, we need to provide a Java runtime environment. Get one here. - Embed the Java-Logic into your Python app:
In this post I have shown the simpler of two approaches, how this can be done.
If you’ve followed this tutorial from the start, these steps have already been taken and you’re now ready to take the last one.
Install auto-py-to-exe
Since we will use the auto-py-to-exe deplyoment tool we first have to install it:
$ pip install auto-py-to-exeThe tool allows us two ways of deployments:
- Deployment as a Folder
- Deployment as a single Executable File
In order for our python sourcecode to work with either option, we have to adapt file-paths a bit. The reason is because within the single executable file deployment all files will be extracted from the exe into a defined folder in the user’s app-data folder and thus file paths might not be accessed in the expected manner.
Adapt the File Paths
Instead of directly embedding the file-location paths in your python script as shown here
    # launch py4j gateway to lib-jar and expose it as a service
    gateway = JavaGateway.launch_gateway(jarpath='bin/py4j-0.10.9.2.jar', classpath='bin/addition.jar', java_path='jdk-11.0.11+9-jre/bin/java.exe', die_on_exit=True, use_shell=False)
we would rewrite the first section of our addition_dialog.py script as follows:
if __name__ == "__main__":
    import sys
    import os

    try:
       wd = sys._MEIPASS
    except AttributeError:
       wd = os.getcwd()
    # render file-paths working in one-file deployment mode of pyinstaller (auto-py-to-exe) as well as in directory-mode
    # this is the (most recent / currently used) py4j.jar
    jarpath = os.path.join(wd, "py4j-0.10.9.2.jar")
    # this is the business-logic we want to expose for usage in python
    classpath = os.path.join(wd, "addition.jar")
    # this is the java runtime
    java_path = os.path.join(wd, "jdk-11.0.11+9-jre", "bin", "java.exe")

    # launch py4j gateway to lib-jar and expose it as a service
    gateway = JavaGateway.launch_gateway(jarpath=jarpath, classpath=classpath, java_path=java_path, die_on_exit=True, use_shell=False)
At the beginning we use the Windows-proprietary way to determine the working directory. If it fails, we go for the normal way. 😛 In the following lines we determine the jarpath, classpath and java_path of our project. The complete sourcecode of our dummy app can be obtained here.
Configure your Deployment
Now we’re ready to launch the auto-py-to-exe tool and configure the deployment of our python app including all stuff needed in order to properly run the PyQt UI with the Java based business logic.
Make sure, the virtual environment is activated, go to your project’s home folder and issue the following command in the shell:
$ auto-py-to-exeProvide the ‘–no-chrome‘ switch if you don’t have chrome installed on your computer. After execution of the command above you will see a window looking as follows:
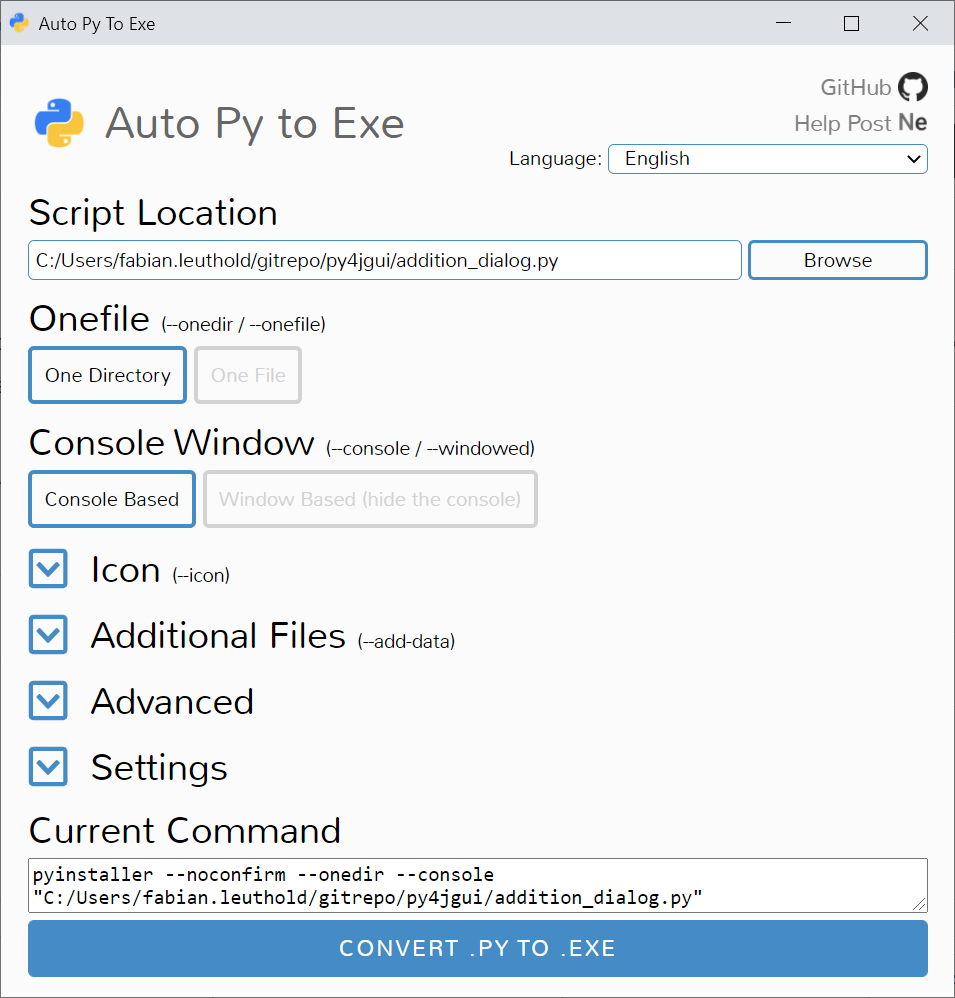
Now in order for the deployment to work, you have to make the following configuration:
- In the field ‘Script Location’ select the path to your python script located in your project folder
- In the ‘Onefile’ option select ‘One Directory’ (at least for now to test, whether the deployment works as it should)
- In the ‘Console Window’ section select ‘Console Based’ (at least for now)
- In the Icon section provide an Icon, if you like
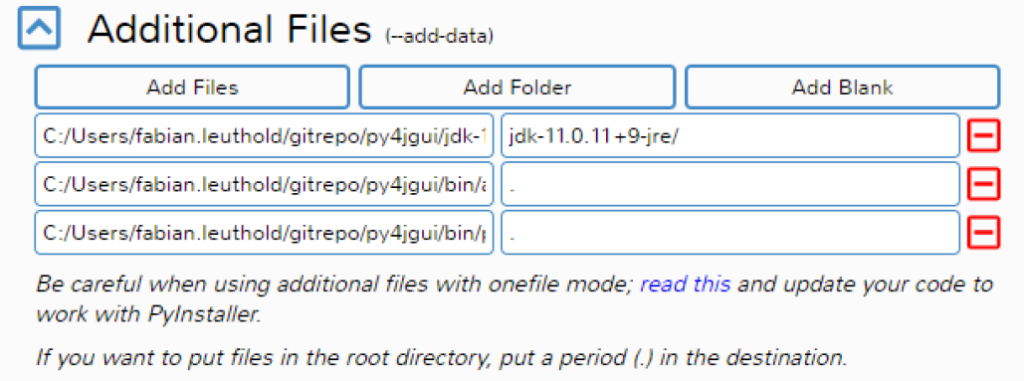
- In the ‘Additional Files’ section
- Add Folder: provide the directory to your project’s JRE folder, leave the in-deployment folder as proposed
- Add File: add the addition.jar containing the Java business logic, leave the in-deployment folder as ‘.’
- Add File: add the py4j-0.10.9.2.jar (you’ll probably find a newer version) containing the Java py4j library, leave the in-deployment folder as ‘.’
After having configured everything, the ‘Additional Files’ section of the tool should look somewhat like this:
Now you’re done! You can now give it a try and start conversion. Click the ‘Convert .py to .exe’ button. Pyinstaller would create an ‘output’ folder within your project root containing all stuff necessary to distribute your application. If everything works fine: Congrats! You’ve now managed to deploy a really challenging python application with embedded JRE, Java business Logic and PyQt User Interface!
You can now try to build a One File deployment and choose ‘Window Based’ to prevent ‘some’ of the console windows from showing up during application startup. However, up to now I didn’t manage to prevent java from opening a new console window.