
What is the objective here?
I will document the steps needed to setup Gurobi to solve a Linear Program in the cloud. For this example we will use a simple linear model and use Matlab to invoke the locally installed Gurobi solver, which in turn would forward it to a Gurobi Compute Server, which we can configure using the Gurobi Instant Cloud Manager.
What do I need?
In order to access Gurobi Instant Cloud you first need to register and request a Cloud license or sign up for a trial. Since I’m working for the OST, I’m using a free trial account in order to take my first steps with Gurobi Instant Cloud. For documentation I’ll refer to this tutorial, provided by Gurobi itself.
How about the billing?
This usecase is applicable for universities of applied sciences or software companies, providing optimization solutions for other customers who need to have access to an excellent solver. This way you can provide solutions using GUROBI and issue / manage licenses for your customers, who in turn get access to the Compute Servers you configure in the cloud. GUROBI would bill you the time, your customers are using their Cloud Instances to solve their optimization tasks. Pricing depends on the License-Model you choose. Currently you pay 10 k$ for a Cloud Silver License, 20 k$ for a Cloud Gold license, which charges 8 $/hour 8-core usage or 5 $, respectively. These prices are taken from an old Gurobi PDF online in 2017 and are subject to change; pricing philosophy has unfortunately changed from transparent to intransparent and since then is inquiry-driven.
Install Gurobi on your machine
First, in order to use Gurobi on your machine. No matter, whether you want to use a local instance for solving optimization tasks or let gurobi use a Compute Server in the cloud – you need to install Gurobi locally. If you haven’t installed Gurobi already, download it here, then install it on the machine, you want to run your optimization on.
Get your Cloud License File
Now you have got to login to your Gurobi online account and go to the cloud manager, by selecting “Your Cloud Licenses” from the “Downloads & Licenses” navigation menu entry:
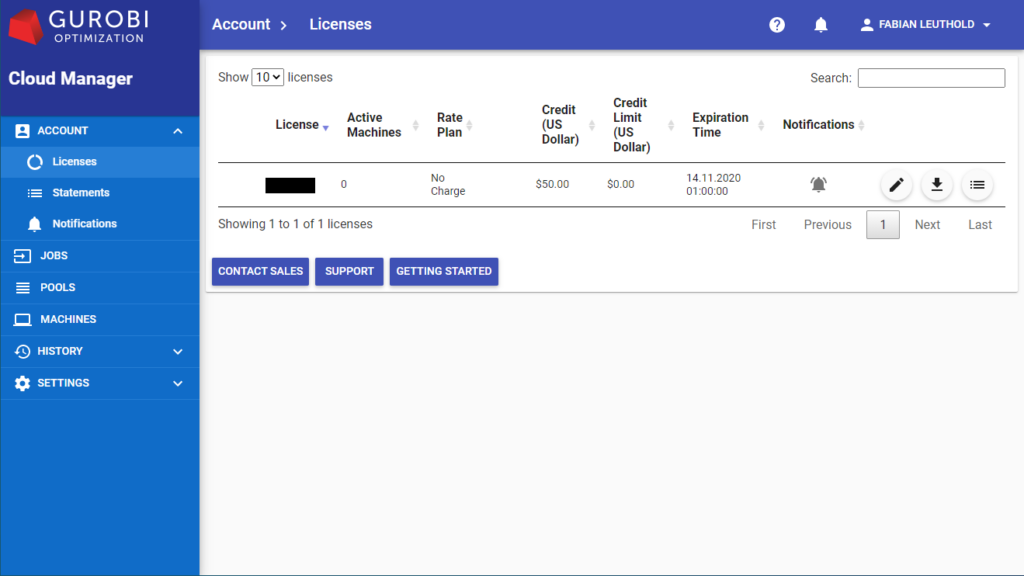
Now click on the Download icon ![]() to download your License File referring to the cloud. You’ll typically end up having a gurobi.lic file in your download folder.
to download your License File referring to the cloud. You’ll typically end up having a gurobi.lic file in your download folder.
Install your License File
Now you have to determine where to install your license file in order for gurobi to find it. Depending on the OS you’re working the locations differ and you even might have had a previous installation of Gurobi and specified a special location for the gurobi license file or have the GRB_LICENSE_FILE set to point to the license file location.
The easiest way however to find out, where gurobi is expecting the license file is to start gurobi from the commandline and have it complain about the missing license. Therefore open your commandline / shell or whatever and launch gurobi. In my case I get the following output:
H:\>gurobi
Python 3.7.6 (tags/v3.7.6:43364a7ae0, Dec 19 2019, 00:42:30) [MSC v.1916 64 bit (AMD64)] on win32
Type "help", "copyright", "credits" or "license" for more information.
Using license file C:\Users\LEN\gurobi.lic
Set parameter LogFile to value gurobi.log

License expired 2020-06-09
Now I know that gurobi is looking in the “C:\Users\LEN\gurobi.lic” file in order to check my license, and so I’ll copy the license-file downloaded from the Cloud Manager there and replace the old expired local license with the license from the cloud.
Startup a Machine in the Cloud and check Connection
Check, whether you can start a machinn. CAUTION: This step will charge your cloud license account, since it will startup an instance of a Gurobi Compute Server!
For this, now try to start gurobi again, after having placed the downloaded license file in the correct location:
Python 3.7.6 (tags/v3.7.6:43364a7ae0, Dec 19 2019, 00:42:30) [MSC v.1916 64 bit (AMD64)] on win32
Type "help", "copyright", "credits" or "license" for more information.
Using license file C:\Users\LEN\gurobi.lic
Set parameter LogFile to value gurobi.log
License expired 2020-06-09
H:\>gurobi
Python 3.7.6 (tags/v3.7.6:43364a7ae0, Dec 19 2019, 00:42:30) [MSC v.1916 64 bit (AMD64)] on win32
Type "help", "copyright", "credits" or "license" for more information.
Using license file C:\Users\LEN\gurobi.lic
Set parameter CloudAccessID
Set parameter CloudSecretKey
Set parameter LogFile to value gurobi.log
Waiting for cloud server to start (pool default)...
Starting...
Starting...
Starting...
Compute Server job ID: e899a087-12c4-4178-8bab-ba8a0d7ac2bd
Capacity available on 'https://ip-10-0-67-45:61000' - connecting...
Established HTTPS encrypted connection
Gurobi Interactive Shell (win64), Version 9.1.0
Copyright (c) 2020, Gurobi Optimization, LLC
Type "help()" for help
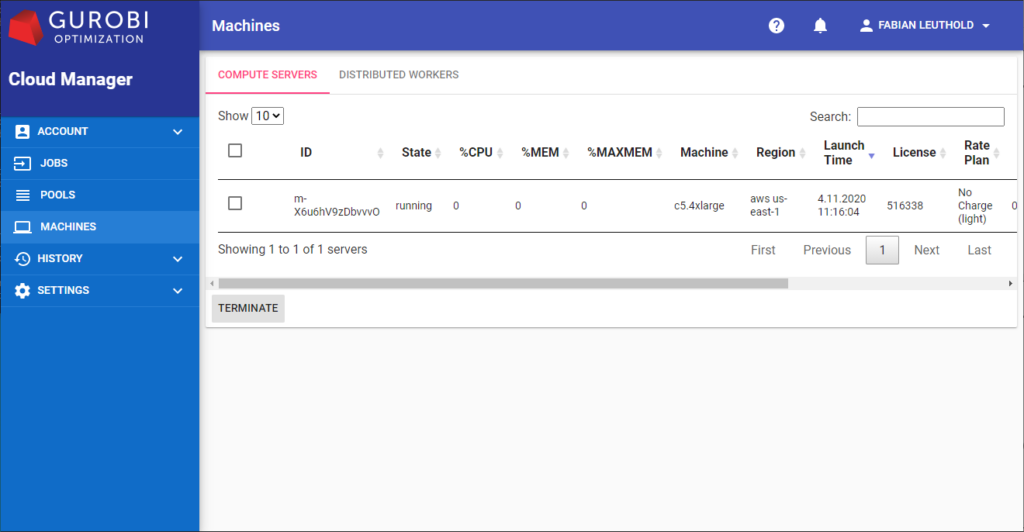
gurobi>You can also follow what happens in the background when checking the Gurobi Cloud Manager and go to the machines-tab:

At that moment, your commandline would repeatedly prompt “starting…” while your dedicated virtual machine in the cloud is launched. After a while, the commandline would return the control to you and you could provide your Gurobi Compute Server instance with an optimization task.
Congratulations! You’ve successfully launched an instance of a Gurobi Compute Server dedicated to you!
Now we want to solve a simple linear model in the cloud using Matlab.
Startup your Matlab IDE
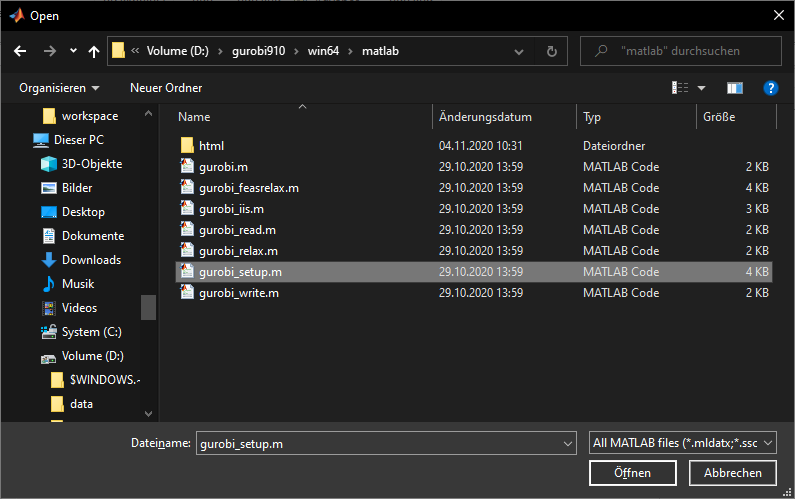
Now launch your Matlab Environment. In the Code Editor hit Ctrl-O to open the File-Open Dialog and navigate to the location, you just installed Gurobi to. In my case this is ‘D:\gurobi910’. Look for a os-Folder containing a matlab folder, containing a script named ‘gurobi_setup.m’. In my case this is here:
D:\gurobi910\win64\matlab
Choose ![]() from the Matlab Navigation bar and confirm to change to the current folder. In the Matlab Console you’ll get the following output:
from the Matlab Navigation bar and confirm to change to the current folder. In the Matlab Console you’ll get the following output:
>> gurobi_setup

The MATLAB interface for Gurobi 9.1.0 has been installed.

The directory
    D:\gurobi910\win64\matlab\
has been added to the MATLAB path.
To use Gurobi regularly, you must save this new path definition.
To do this, type the command
    savepath
at the MATLAB prompt. Please consult the MATLAB documentation
if necessary.
Now call the ‘savepath’ command from the Matlab console in order to add the path indicated to the matlab path collection.
Get a Sample Matlab – GUROBI Optimization Script
Here we use an official diet optimization problem, which you can find here on the Gurobi website or here in my gist.
Open the script diet.m in Matlab and again choose the run-button ![]() in order to launch the script and confirm changing to the required folder.
in order to launch the script and confirm changing to the required folder.
If you got everything right, Matlab would then pass the linear model to Gurobi, which would hand over the model to your started instance of a Gurobi Compute Server in the cloud. The output should look something like this:
>> diet
Waiting for cloud server to start (pool default)...
Starting...
Starting...
Starting...
Starting...
Compute Server job ID: 060b9da9-41b2-4322-98e1-437d190cd1ae
Capacity available on 'https://ip-10-0-68-62:61000' - connecting...
Established HTTPS encrypted connection
Gurobi Optimizer version 9.1.0 build v9.1.0rc0 (win64)
Gurobi Optimizer version 9.1.0 build v9.1.0rc0 (linux64)
Thread count: 8 physical cores, 16 logical processors, using up to 16 threads
Optimize a model with 4 rows, 13 columns and 40 nonzeros
Coefficient statistics:
  Matrix range     [1e+00, 2e+03]
  Objective range  [9e-01, 3e+00]
  Bounds range     [6e+01, 2e+03]
  RHS range        [0e+00, 0e+00]
Presolve removed 0 rows and 3 columns
Presolve time: 0.01s
Presolved: 4 rows, 10 columns, 37 nonzeros

Iteration    Objective       Primal Inf.    Dual Inf.      Time
       0    0.0000000e+00   1.472500e+02   0.000000e+00      0s
       4    1.1828861e+01   0.000000e+00   0.000000e+00      0s

Solved in 4 iterations and 0.02 seconds
Optimal objective  1.182886111e+01

Cost: 11.828861

Buy:
 hamburger 0.604514
      milk 6.97014
 ice cream 2.59132

Nutrition:
  calories 1800
   protein 91
       fat 59.0559
    sodium 1779

Adding constraint at most 6 servings of dairy
Compute Server job ID: 202e6bf6-e65e-4ef9-ac71-140387268def
Capacity available on 'https://ip-10-0-68-62:61000' - connecting...
Established HTTPS encrypted connection
Gurobi Optimizer version 9.1.0 build v9.1.0rc0 (win64)
Gurobi Optimizer version 9.1.0 build v9.1.0rc0 (linux64)
Thread count: 8 physical cores, 16 logical processors, using up to 16 threads
Optimize a model with 5 rows, 13 columns and 42 nonzeros
Coefficient statistics:
  Matrix range     [1e+00, 2e+03]
  Objective range  [9e-01, 3e+00]
  Bounds range     [6e+01, 2e+03]
  RHS range        [6e+00, 6e+00]
Presolve removed 0 rows and 3 columns
Presolve time: 0.00s
Presolved: 5 rows, 10 columns, 39 nonzeros

Iteration    Objective       Primal Inf.    Dual Inf.      Time
       0    0.0000000e+00   1.472500e+02   0.000000e+00      0s

Solved in 3 iterations and 0.00 seconds
Infeasible model
No solution
Congratulation! You’ve mastered to solve your first LP using a Gurobi Compute Server machine in the cloud!
Shut down your Machine in the Cloud
In order to prevent your machine from generating unnecessary cost an charging your account for an idle machine which is up and running, you can manually shut down the instance, if you don’t need it any longer. For this, navigate to the ‘MACHINES’ navigation item, choos the machine to terminate and hit the ‘TERMINATE’ button:
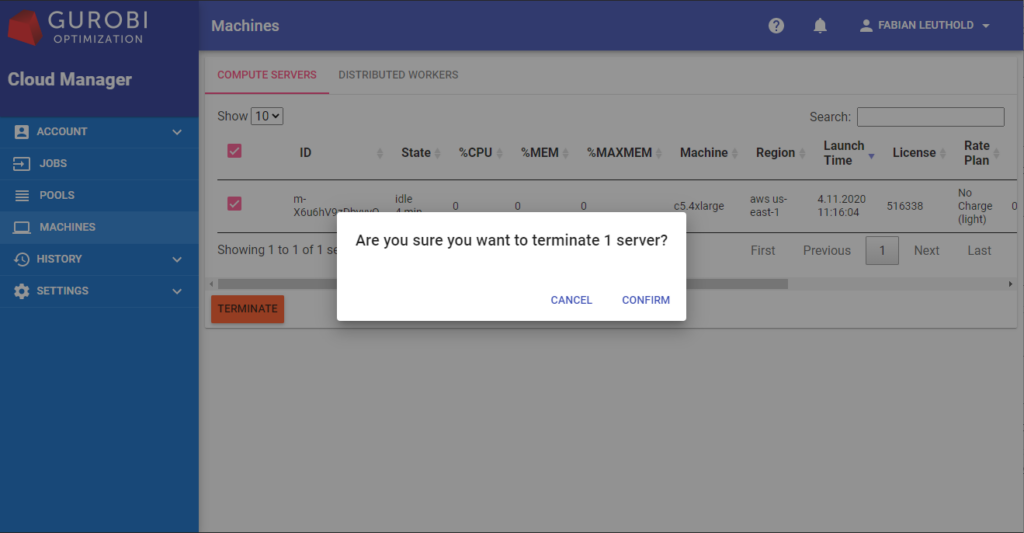
After a moment you’ll see the machine disappear in the list of running machines and get an entry in the ‘HISTORY’, listing information about former runs of machines in the cloud.